
Executing a precise under tray toolbox installation alongside a heavy-duty poly water tank setup is one of the most practical upgrades you can perform on a four-wheel drive utility vehicle. Flat tray platforms provide expansive deck space for carrying tools, camping gear, and trade equipment, but leaving the dead space beneath the tray bed unutilized is a missed opportunity for optimal storage organization. Performing a professional under tray toolbox installation transforms empty wheel arch spaces into secure, weatherproof lockups for recovery gear, air compressors, and hand tools while lowering your vehicle’s overall center of gravity.
For tradespeople and outback touring enthusiasts, planning an under tray toolbox installation requires careful attention to structural mounting points, mudguard clearances, and axle weight distribution. Mounting heavy steel or aluminum toolboxes directly beneath the tray floor deck ensures that dense cargo sits low to the chassis rails rather than stacked high on top of the tray bed. Whether you are outfitting a Toyota HiLux, Ford Ranger, Isuzu D-Max, or LandCruiser 79 Series, mastering every stage of an under tray toolbox installation guarantees your gear remains protected against dust intrusion, water ingress, and severe offroad track vibrations.
In this ultimate technical guide, we break down every stage of an under tray toolbox installation. From selecting mounting brackets and calculating water tank weight distribution to sealing weather rubbers, routing plumbing lines, and ensuring transport compliance, this article provides the complete technical blueprint for your under tray toolbox installation.
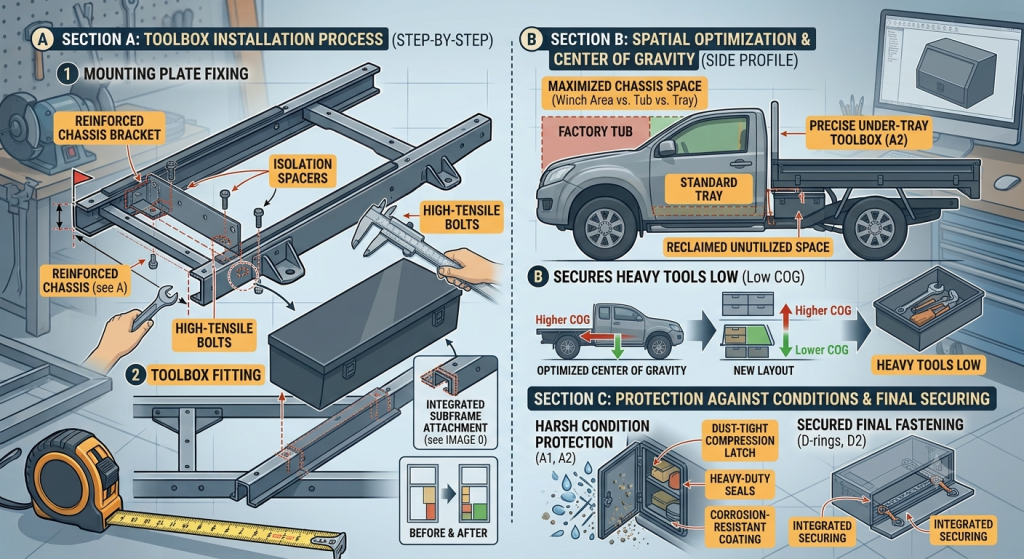
Understanding the structural load paths involved in an under tray toolbox installation is essential for maintaining subframe integrity across corrugated outback tracks.
              [ Structural Architecture of an Under Tray Toolbox Installation ]
                                              │
  ┌───────────────────────────────────────────┴───────────────────────────────────────────┐
  ▼                                                                                       ▼
[ Tapered Under Tray Storage Modules ]                                   [ Under-Tray Water Tank Systems ]
• Fixed to main longitudinal runners & outer perimeter rope rails        • Positioned centrally over or forward of the rear axle line
• Utilizes rubber isolation washers to dampen harmonic vibration         • Features internal baffles to reduce dynamic liquid sloshing
• Includes continuous rubber bulb seals against dust and mud spray      • Connects to high-flow 12V pressure pumps & breather lines
• Integrates stainless steel key-locking T-latches for high security      • Constructed from high-density food-grade polyethylene (HDPE)
The fundamental goal during an under tray toolbox-installation is securing heavy storage units without interfering with suspension travel or chassis flex. An under tray toolbox installation relies on suspended cantilever mounting brackets that attach directly to the tray’s crossmembers and perimeter side coamings. Spacing the mounting brackets correctly prevents localized sheet metal fatigue and reduces stress cracking along the toolbox welds.
Additionally, installing EPDM rubber isolation washers between the tray crossmembers and the mounting tabs of your toolbox is a vital step in any under tray toolbox installation. Isolation washers absorb road harmonic vibrations and accommodate frame articulation when navigating technical offroad tracks, preventing fatigue cracks from forming around bolt holes.
Mounting toolboxes and water tanks beneath your flat deck requires systematic positioning and secure fastening. Here are seven fundamental procedures to follow during an under tray toolbox installation:
Before drilling mounting holes for an under tray toolbox installation, measure the clearance arc between the rear tire and the inner face of the toolbox at full suspension compression.
Utilizing 3mm structural steel or 4mm aluminum angle brackets during an under tray toolbox installation ensures your boxes can support heavy tools across rough corrugated roads.
Mark and drill fastener holes for your under tray toolbox installation, then insert EPDM rubber isolation washers between the tray deck undersides and toolbox tabs to damp road vibration.
Checking door rubber integrity during an under tray toolbox installation prevents fine bulldust and pressurized water spray from entering the storage cavity during river crossings.
Positioning heavy water tanks centrally forward of the rear axle line during an under tray toolbox installation maintains vehicle balance and steering stability.
Routing food-grade poly hoses and breather lines cleanly during an under tray toolbox installation prevents line pinching and ensures smooth gravity-fed or pump-driven water flow.
Completing an under tray toolbox installation with adjustable stainless steel compression T-latches keeps toolbox doors tightly sealed against dust gaskets.
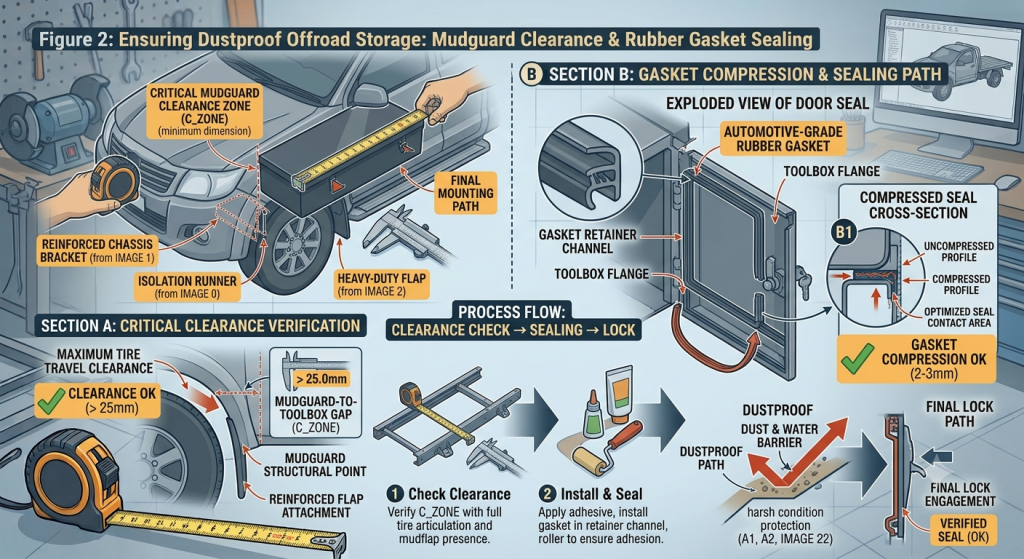
Figure 2: Verifying mudguard clearance and sealing automotive rubber gaskets during an under tray toolbox installation ensures dustproof offroad storage.
Evaluating structural metrics demonstrates how an under tray toolbox installation compares across different materials and storage layouts:
| Feature / Specification | Tapered Aluminum Under-Tray Box | Heavy-Duty Steel Under-Tray Box | Molded Poly Under-Tray Water Tank | Under-Tray Slide-Out Drawer |
| Primary Material | 2.5mm Marine Grade Aluminum | 2.0mm Powder-Coated Steel | Food-Grade Polyethylene (HDPE) | Galvanized Steel & Alloy Deck |
| Average Dry Weight | 8 kg – 14 kg per box | 15 kg – 22 kg per box | 10 kg – 16 kg (Empty) | 45 kg – 70 kg (Assembly) |
| Typical Storage Volume | 25L – 50L per side | 25L – 50L per side | 40L – 80L Liquid Capacity | 80L – 140L Tool Capacity |
| Ingress Protection Rating | IP65 (Dust & Water Resistant) | IP65 (Dust & Water Resistant) | Sealed Tank (Food Safe) | IP54 (Weather Resistant) |
| Impact Resistance | Moderate (Dents under rocks) | High (Heavy Duty Defense) | High (Flexible Poly Impact) | High (Rigid Frame Casing) |
| Vibration Isolation | Rubber Washer Mounts | Rubber Washer Mounts | Poly Strap Clamp Mounts | Crossmember Bolt Mounts |
| Ideal Load Contents | Recovery Gear, Air Hoses | Heavy Hand Tools, Chains | Potable Drinking Water | Long Recovery Tracks, Shovels |
Choosing appropriate materials for storage boxes and water tanks is an important design phase when planning an under tray toolbox-installation.
             [ Material Selection for Under Tray Storage Accessories ]
                                         │
  ┌──────────────────────────────────────┴──────────────────────────────────────┐
  ▼                                                                             ▼
[ Marine-Grade Aluminum Alloy (5052-H32) ]                    [ Food-Grade High-Density Polyethylene ]
• Saves critical unladen weight during installation            • Lightweight, non-corrosive, UV-stabilized tank material
• Natural oxide layer resists road grime and salt spray        • Flexible wall construction absorbs stone impacts
• Easy to drill and custom fit onto tray subframes             • Smooth inner surfaces prevent algae growth in drinking water
• Requires rubber washers to isolate against steel frames      • Features internal baffles to restrict dynamic water sloshing
Selecting marine-grade aluminum for an under tray toolbox installation offers significant weight savings. Aluminum toolboxes reduce unladen mass on the rear suspension while providing reliable protection against road debris. Incorporating folded ribs and fully welded seams into an aluminum under tray toolbox installation ensures the doors remain rigid under heavy use.
When integrating water storage alongside an under tray toolbox installation, food-grade high-density polyethylene (HDPE) is the industry standard. Polyethylene tanks will not rust, corrode, or transfer metallic tastes to drinking water. Additionally, poly water tanks fitted during an under tray toolbox installation flex slightly under impact rather than denting or cracking, making them exceptionally durable on rough 4WD tracks.
Follow this structured operational sequence to complete your under tray toolbox installation safely and efficiently.
1.Inspect Clearances and Mark Subframe Mounts:Clear workshop floor, hoist vehicle securely, and check mudguard clearance.
Park the vehicle on level ground and measure distances from tires, leaf springs, and mudguards. Mark bracket mounting locations on the tray crossmembers to begin your under tray toolbox installation.
2.Assemble and Position Cantilever Support Brackets:Fabricate angle brackets, drill fastener holes, and fit isolation washers.
Bolt or weld support angle brackets to the tray subframe. Fit EPDM rubber isolation washers to dampen vibrations during this phase of your under tray toolbox installation.
3.Mount Toolboxes and Secure Fasteners:Position box onto brackets, align door edges, and torque high-tensile hardware.
Lift the box into position, verify that the drop-down door operates freely without striking mudguards, and torque high-tensile fasteners to complete the mechanical mounting for your under tray toolbox installation.
4.Mount Under-Tray Poly Water Tank Assembly:Secure poly tank centrally over axle line using heavy rubber-lined straps.
Position the water tank centrally forward of the rear axle line. Secure the tank using heavy stainless steel or rubber-lined mounting straps as part of your under tray toolbox installation.
5.Route Plumbing, Fit Seals, and Perform Final Checks:Connect breather lines, fit water taps, and test bulb seals for leaks.
Attach food-grade water outlet hoses, mount a lockable water tap to the tray coaming, adjust door compression latches, and test all rubber seals to finalize your under tray toolbox installation.
explore our complete range of 4x4 armor, side steps, and rock slider
Every completed under tray toolbox installation must comply with national vehicle safety standards. In Australia, external vehicle storage additions are regulated by standards published by the Federal Register of Legislation under Australian Design Rules ADR 13/00 (Installation of Lighting) and ADR 42/00 (General Safety Requirements).
                  [ ADR Safety Compliance Criteria ]
                                    │
   ┌────────────────────────────────┼────────────────────────────────┐
   ▼                                ▼                                ▼
[ Overall Vehicle Width Limits ]  [ Ground Clearance Rules ]       [ Rear Lighting Projection ]
• Must not extend beyond the      • Must maintain adequate ground  • Under tray boxes must not block
  outer edge of the tray deck      clearance behind rear wheels     visibility of tail light clusters
Maintaining your storage accessories after an under tray toolbox installation extends their operational service life and keeps equipment protected.
Reviewing real-world applications demonstrates how different vehicle owners complete an under tray toolbox installation:
Use this practical summary checklist when planning your under tray toolbox installation: