
Installing an exterior visor on your 4WD or commercial ute provides essential shade against blistering outback heat and low-angle highway glare. While black textured finishes and mesh screens suit utilitarian builds, nothing elevates a touring rig like a paint-matched solid visor. When you colour match sun visor hardware to your vehicle’s factory bodywork, the visor integrates seamlessly into the roofline, looking like an original factory option rather than an aftermarket add-on.
However, achieving a factory-grade finish on a steel or composite visor requires more than grabbing a generic aerosol can off a hardware store shelf. Between locating the exact manufacturer colour formulation, properly prepping transit primers, masking anti-glare undersides, and spraying UV-stable two-pack (2K) topcoats, a professional DIY finish comes down to preparation and technique.
This practical guide walks you through the step-by-step process to colour match sun visor panels to your vehicle’s OEM paint code in your home shed or workshop.
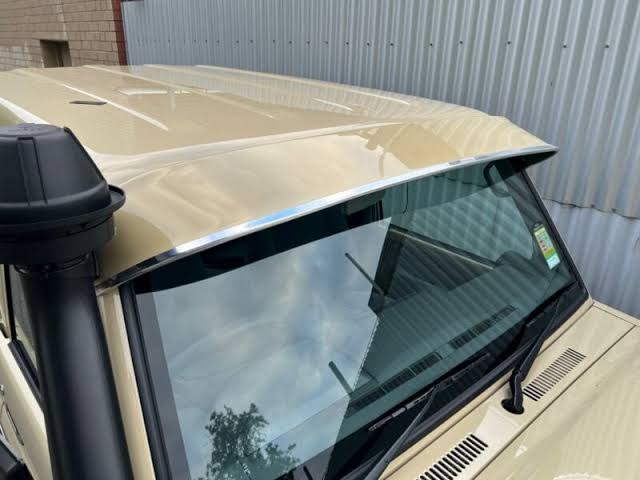
Step 1: Locating Your Vehicle’s OEM Paint Code
Every automotive manufacturer assigns a specific alphanumeric code to each factory colour formulation. Even colours that look identical to the naked eye—such as Toyota’s French Vanilla (058) versus Glacier White (040)—feature subtle differences in tint, yellow toners, and metallic pigments.
Before you attempt to colour match sun visor panels, locate the vehicle identification plate (VIN plate) to retrieve your exact formulation:
[ Vehicle Build Plate / VIN Tag ]
========================================
MODEL: VDJ79R-TJMNYQ
ENGINE: 1VD-FTV  4461cc
FRAME: VDJ79-0012345
COLOR / TRIM: 4E9 / LA11  <--- "4E9" = Sandy Taupe (Exact OEM Paint Code)
TRANS / AXLE: H152F / B02A
========================================
| Vehicle Manufacturer | Build Plate Location | Common Outback 4WD Colours & Codes |
| Toyota (LandCruiser, Hilux, Prado) | Passenger-side firewall or driver-side B-pillar door jamb | 4E9 (Sandy Taupe), 058 (White), 1G3 (Graphite Grey) |
| Ford (Ranger, Everest) | Driver-side front door jamb or radiator support panel | A2W (Cool White), M7325 (Meteor Grey), M7343 (Shadow Black) |
| Isuzu (D-Max, MU-X) | Engine bay passenger-side inner guard or B-pillar striker | 527 (Splash White), 575 (Obsidian Grey), 573 (Neptune Blue) |
| Holden (Colorado, Commodore) | Radiator upper support panel or passenger-side B-pillar | 158A (Heron White), G7C (Red Hot), 421N (Switchblade Silver) |
| Nissan (Patrol, Navara) | Engine bay firewall (centre or passenger side) | QM1 (Polar White), K51 (Platinum Grey), KH3 (Black) |
Once you record your paint code, visit an automotive paint supply store. They can mix your exact formulation into professional spray cans with integrated fan nozzles or provide two-pack (2K) automotive refinishing paint for spray guns.
Step 2: Essential Painting Materials and Tools
Achieving a durable finish that resists high-speed bugs, highway gravel, and extreme Australian UV radiation requires dedicated automotive-grade supplies:
- Automotive Topcoat Paint: 500ml of basecoat mixed to your vehicle paint code (or two aerosol cans mixed with OEM paint codes).
- 2K Automotive Clear Coat: A two-component polyurethane clear coat containing an internal catalyst button. 2K clear coat cures rock-hard via chemical reaction, resisting petrol, diesel, and stone chips far better than standard 1K acrylic clears.
- Anti-Glare Underside Paint: Matte black or aviation-spec satin green enamel for the visor’s underside.
- Prep and Sanding Media: P400 and P800 wet/dry sandpaper, grey Scotch-Brite scuffing pads.
- Degreasing Agent: Automotive wax and grease remover (pre-cleaner).
- Automotive Masking Tape: High-temperature green or blue crepe masking tape and masking paper.
- Personal Protection: Nitrile gloves, organic-vapour respirator mask (rated for 2K isocyanates), and safety glasses.
Step 3: Surface Preparation and Scuffing
High-quality products—such as the Solid Heavy Duty Alloy sunvisor or the classic Solid Holden Commodore VN-VS Sunvisor—are supplied in a transit primer or pre-treated zinc coating. This coating protects the metal during freight, but you must scuff it to provide physical “keying” (mechanical adhesion) for your colour coat.
[ Unpack & Inspect Visor ]
            │
            ▼
[ Wipe Down with Wax & Grease Remover ]
            │
            ▼
[ Scuff Surface with P400 / P800 Wet & Dry ]
            │
            ▼
[ Mask Polished Aluminium Trim & Underside ]
            │
            ▼
[ Tack Rag Wipe & Apply Colour Basecoat ]
- Thorough Initial Degreasing: Spray the entire visor body with wax and grease remover and wipe it dry using clean microfibre cloths. Never touch the bare panels with sweaty hands after cleaning, as skin oils can cause silicone fisheyes in the topcoat.
- Keying the Primer: Wet sand the entire top surface using P400 to P600 wet-and-dry sandpaper lubricated with water and a drop of dish soap. Sand in overlapping circular motions until the entire transit primer has a uniform, dull matte appearance with zero glossy spots.
- Scuffing Intricate Contours: Use a fine grey Scotch-Brite pad along mounting bracket folds, drain holes, and edge curves where flat sandpaper cannot reach.
- Final Rinse and Dry: Rinse off sanding slurry with clean water, dry the panel completely using compressed air or lint-free rags, and perform a final wipe with wax and grease remover.
Step 4: Masking the Underside and Polished Trim
A common mistake made when people colour match sun visor assemblies is painting the entire unit in body colour, including the underside.
Drawing on long-haul transport and aviation safety standards, the underside of an external sun visor should be finished in non-reflective satin green or matte black. If you spray high-gloss body colour (especially bright white, silver, or light tan) onto the bottom face of the visor, sunlight bouncing off the bonnet will reflect off the visor underside straight into your eyes.
       ================================================= (Top: Gloss OEM Body Colour)
       [============== Solid Sun Visor Shell ==========]
       ================================================= (Underside: Matte Anti-Glare Green/Black)
                               |
                               v
                     [ Windscreen Glass ]
- Spray the Underside First: Spray two coats of satin anti-glare green or matte black to the bottom face of the visor. Allow it to flash off and dry for 3 to 4 hours.
- Mask the Underside Edge: Run your automotive masking tape along the bottom rolled lip, carefully trimming with a fresh razor blade to establish a crisp paint divide line. Mask off the entire underside with brown automotive kraft paper.
- Protect the Polished Strip: If your visor features a classic polished aluminium front trim strip, cover the metal carefully with fine-line tape to prevent overspray.
Step 5: Applying the Basecoat Colour
With the visor masked and secured on a stable stand in a clean, well-ventilated workshop, you can now apply the basecoat:
[ Tack Rag Wipe ] ---> [ Dust / Tack Coat (30% coverage) ] ---> [ Flash 10 min ]
                      ---> [ Wet Coat 1 (80% coverage) ]   ---> [ Flash 15 min ]
                      ---> [ Full Wet Coat 2 (100% coverage) ]
- Tack Rag Pass: Lightly glide a sticky tack cloth over the panel to remove any floating dust particles.
- The Tack Coat (Mist Coat): Spray a light, dry mist coat across the upper surface from a distance of 20cm to 25cm. This coat should achieve roughly 30% opacity. Allow it to flash off (dry to a dull matte finish) for 10 minutes.
- First Full Coat: Apply an even, overlapping medium-wet coat using 50% overlap on each horizontal pass. Maintain a consistent distance and travel speed from one side of the visor to the other.
- Second Full Coverage Coat: After 15 minutes of flash time, apply a second full wet coat to achieve complete colour saturation. If your vehicle uses metallic or pearl paint (such as Toyota Graphite Grey or Ford Meteor Grey), finish with a lighter “drop coat” sprayed from 35cm away to orient the metallic flakes evenly without mottling.
Step 6: 2K Clear Coat Application and Curing
The clear coat gives your colour match sun visor its deep gloss while providing essential ultraviolet (UV) blockers to prevent the colour from fading under the harsh Australian sun.
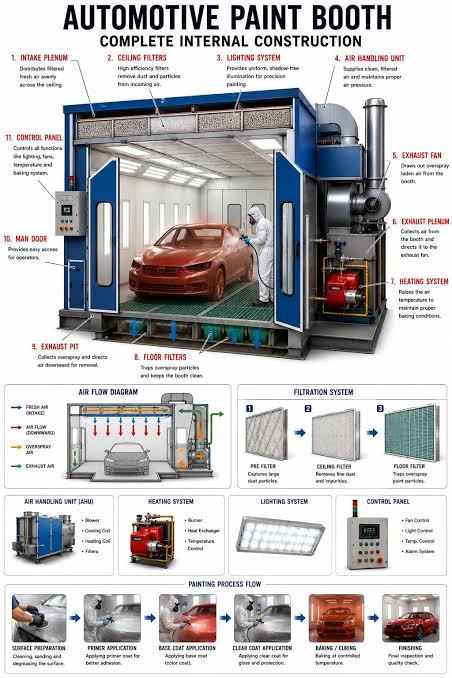
- Activate the 2K Can: If using a 2K aerosol can, insert the supplied plunger pin into the bottom of the can and strike it on a hard surface to puncture the internal hardener canister. Shake vigorously for two full minutes to mix the catalyst and resin.
- Apply Coat One: Approximately 30 to 40 minutes after your final basecoat, apply a medium-wet coat of clear. Ensure you maintain wet edges to prevent dry spray texture.
- Apply Coat Two: Allow 10 to 12 minutes for the first clear coat to flash off until it feels tacky but does not transfer paint to a gloved finger. Apply a second full, wet coat of 2K clear. Watch the reflection of your workshop lights on the panel to lay down a smooth, glass-like finish without causing runs or sags.
- Curing: Leave the visor to cure in a warm, dust-free room for at least 24 to 48 hours before handling. The chemical cross-linking of 2K polyurethane takes up to 7 days to reach full rock-hard curing, so avoid washing with harsh chemicals during the first week.
Paint Matching Popular 4WD Platforms
Different utility platforms present specific styling and paint characteristics:
- Toyota LandCruiser 70 Series: Pairing a Solid 79 Series Sun Visor with factory Sandy Taupe (paint code 4E9) or French Vanilla (058) gives single-cab and dual-cab workhorses an authentic outback look.
- Toyota Hilux (N70 & N80): When fitting a Solid N70 Hilux Sunvisor or Solid Toyota Hilux 2015-On Mesh Sunvisor, colour-matching to Glacier White (040) or Eclipse Black (218) ties the visor cleanly into the curved A-pillar profiles.
- Holden Commodore Utes & Wagons: When installing a Solid Holden Commodore VN-VS Sunvisor, matching classic acrylic enamel codes like Heron White (158A) restores period-correct lines.
Australian Standards and Legal Road Compliance
When painting and fitting an exterior visor, Australian vehicle standards dictate that your modifications remain roadworthy:
- Forward Field of View (11-Metre Rule): Under state standards—including Transport Victoria VSI 8 Vehicle Modification Standards and Transport for NSW Light Vehicle Safety Check Rules—the painted sun visor must not encroach into the driver’s forward vision. From standard seating height, the driver must maintain a clear view of the road surface 11 metres forward of the front bumper.
- Glare Reflection Standards: Painting the underside in a high-gloss reflective finish violates practical safety standards by causing secondary driver glare. Always ensure the bottom face retains an anti-reflective matte coating.
- Pedestrian Safety Edges: As enforced under the Department of Infrastructure ADR Vehicle Standards and AS 4876.1, the finished visor must retain smooth, deburred edges with a minimum 5mm radius. Never apply heavy paint layers that conceal sharp, un-radiused metal burrs.
Summary: Professional Finish for Australian Touring
Taking the time to colour match sun visor bodywork transforms your 4WD into a cohesive, professional touring machine. By verifying your factory VIN plate paint code, keying the transit primer thoroughly, masking an anti-glare satin underside, and applying a heavy-duty 2K clear coat, your sun visor will withstand severe desert heat and outback corrugations for years to come.
Explore the complete range of external 4WD sun visors to find the right profile for your vehicle, or pair your cab styling with heavy-duty 4WD bull bars and front accessories to complete your off-road setup.
FAQ Section
Where do I find the paint code for my 4WD or ute?
Your vehicle’s paint code is stamped on the manufacturer build plate (VIN tag). On Toyota vehicles (LandCruiser, Hilux), it is typically located on the passenger-side firewall or driver-side B-pillar door striker marked under “C/TR” (Colour/Trim). On Ford and Isuzu utes, look for the metal plate or sticker located inside the driver’s door jamb or under the bonnet on the radiator support panel.
Can I paint my sun visor with a standard 1K spray can?
While standard 1K acrylic spray cans can provide a good colour match, 1K paint lacks a chemical hardener. As a result, it remains relatively soft and vulnerable to stone chips, bird droppings, diesel soot, and petrol spills. Using a 2K (two-component) polyurethane clear coat provides a hard, chemically cross-linked surface that offers superior UV and chip resistance.
Why should the underside of the visor be painted matte green or black?
Painting the underside in a high-gloss body colour (especially light colours like white, silver, or sandy taupe) causes sunlight reflecting off the vehicle’s bonnet to bounce off the bottom of the visor straight into the driver’s eyes. Finishing the underside in non-reflective satin green or matte black absorbs scattered light and eliminates distracting glare.
Do I need to remove the transit primer before painting?
No, you do not need to strip the primer down to bare metal. High-grade aftermarket sun visors are supplied in a protective transit primer or zinc phosphate coating. You simply need to clean the surface with a wax and grease remover, then wet-sand it with P400 to P600 grit sandpaper to create a mechanical key for your basecoat to adhere to.
How long should I wait before installing the visor after painting?
While 2K clear coats are dry to the touch within 12 to 24 hours, the paint continues to chemically harden over several days. Wait at least 48 to 72 hours before handling, drilling, or bolting the visor to your vehicle’s A-pillars to prevent accidental tool gouges or pressure marks in the fresh clear coat.