
Installing an exterior nissan patrol gu sunvisor is widely recognized among Australian four-wheel drive enthusiasts as one of the most effective modifications for long-distance touring. Whether you are navigating wide-open outback highways like the Stuart Highway or tackling technical tracks in the Victorian High Country, blinding solar glare can quickly lead to severe driver fatigue. The Nissan Patrol Y61 platform—encompassing both the Series 1 through 3 models and the updated Series 4 through 9 variants—features a tall windscreen profile that receives significant solar radiation during early morning and late afternoon driving. An aftermarket nissan patrol gu sunvisor creates an extended overhead shield that interrupts direct light paths before sun rays reach your eyes or heat up your dashboard.
Beyond mere driver comfort, a properly selected and mounted nissan patrol gu sunvisor serves as an essential thermal barrier. By casting a continuous shadow over the top section of your windscreen glass, an exterior shade reduces interior greenhouse heat buildup. This simple physical obstruction reduces cabin temperature spikes, lowers the load on your vehicle’s air conditioning compressor, and preserves vital interior components such as dash pads and instrument clusters from premature UV degradation and cracking.
However, retrofitting an exterior visor onto your vehicle requires careful preparation. Unlike clip-on interior accessories, a heavy-duty nissan patrol gu sunvisor must withstand intense high-speed aerodynamic drag, severe chassis flex, and continuous harmonic chatter across thousands of kilometers of corrugated dirt tracks. Incorrect mounting can result in rainwater leaking past body fasteners, unsightly rust streaks staining your A-pillars, or annoying wind chatter at highway speeds.
This comprehensive installation guide provides a step-by-step breakdown of how to install, fit, and maintain a nissan patrol gu sunvisor on both wagon and cab-chassis models. We cover everything from material selection and aerodynamic venting to precise A-pillar drilling techniques, marine weatherproofing, structural stress isolation, and Australian road legality compliance.
Before picking up a drill to install your nissan patrol gu sunvisor, it is critical to understand the material properties of your chosen shade. Manufacturers typically construct exterior visors using three distinct materials, each offering specific structural, visual, and performance characteristics for outback touring.
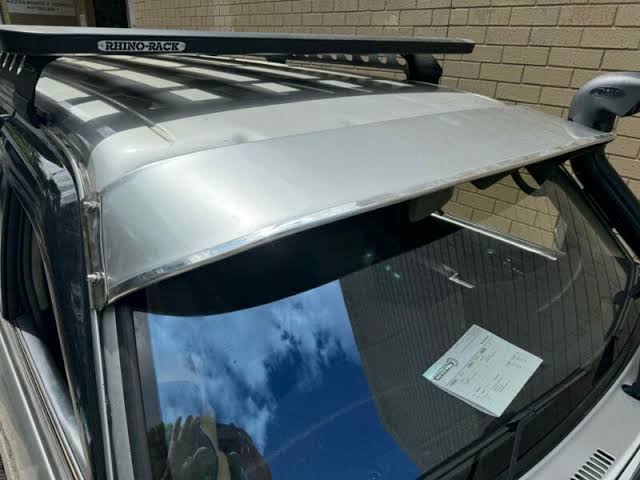
Dark smoke acrylic is a popular material choice for a nissan patrol gu sunvisor due to its translucent optical clarity. Acrylic visors act essentially like high-grade sunglasses for your windscreen header.
Fiberglass composite construction is favored by off-roaders seeking maximum structural rigidity and a color-matched factory look. A fiberglass nissan patrol gu sunvisor is hand-molded using layers of glass matting and polyester resin.
Designed for severe-duty commercial applications, work utes, and agricultural rigs, steel or heavy-gauge aluminum visors offer unmatched impact resistance against flying stones and tree limbs. However, metal units add noticeable weight to the upper cab frame and require heavy-duty anticorrosion coatings to prevent rust along folded sheet metal edges.
Evaluating how different visor materials perform under real-world Australian conditions ensures you select the optimal nissan patrol gu sunvisor build for your touring budget:
| Feature & Performance Metric | Molded Dark Smoke Acrylic | Hand-Laid Fiberglass (FRP) | Heavy-Duty Pressed Steel |
| Material Transparency | Semi-transparent dark tint | 100% Opaque (Solid Shade) | 100% Opaque (Solid Shade) |
| Solar UV Filtering | Blocks 85%+ UV rays | Blocks 100% direct light | Blocks 100% direct light |
| Paint Customization | Tinted glossy smoke finish | Gelcoat ready for color-matching | Powder-coated or sprayed metal |
| High-Speed Drag Flex | Moderate flex (Needs vents) | Zero structural flex | Zero structural flex |
| Bush Track Impact Resistance | Good (Can crack under impact) | High (Easily repaired with resin) | Maximum (Resists severe strikes) |
| Weight Impact on Cab | Ultra-lightweight (~2.5 kg) | Medium weight (~3.8 kg) | Heavy construction (~5.5+ kg) |
| Vibration Damping | Absorbs harmonic chatter | Rigid (Requires rubber pads) | Rigid (Requires heavy mounts) |
| Average Kit Investment | $240 – $380 AUD | $350 – $580 AUD (+ paint) | $450 – $700 AUD |
explore our complete range of Nissan Patrol GU sunvisors and exterior accessories
To appreciate the true benefit of fitting an exterior nissan patrol gu sunvisor, one must look at how light and thermal dynamics operate within an automotive cabin.
                      [ Solar Radiation & Thermal Dynamics ]
                                         │
        ┌────────────────────────────────┴────────────────────────────────┐
        ▼                                                                 ▼
[ Without Exterior Sunvisor ]                                    [ With Exterior Sunvisor ]
• Shortwave UV light penetrates windshield glass                • Overhead sun rays hit exterior shade panel
• Light is absorbed by dark vinyl dash & steering wheel        • Thermal energy is reflected back into open atmosphere
• Energy converts into longwave infrared heat rays             • Top 30% of windscreen remains in continuous shade
• Trapped heat causes greenhouse cabin temperature spikes       • Interior dash surface temperatures drop by 12°C - 18°C
• Air conditioning system works harder, increasing fuel draw   • Reduced AC load preserves engine power on hot days
When sun rays shine through your Patrol’s front windshield, shortwave light passes directly through the clear glass pane. When this light strikes dark surfaces inside your vehicle—such as a black dashboard pad, vinyl trim, or leather steering wheel—it gets absorbed and converted into longwave infrared thermal energy. Glass traps infrared heat inside the vehicle, creating the familiar “greenhouse effect.”
By installing an exterior nissan patrol gu sunvisor, direct solar rays are intercepted before they collide with the glass. Shading the top third of the windshield prevents heat accumulation at the highest point of the cabin, keeping interior temperatures significantly lower during extended parking or daytime highway driving.
Because the Nissan Patrol GU features a relatively flat, vertical windscreen design, fitting an exterior shade introduces an extra aerodynamic surface into incoming high-speed airflow. At 110 km/h, an unvented shade panel can create a high-pressure zone underneath the visor, generating upward aerodynamic lift and undesirable wind noise.
To prevent cabin chatter, premium nissan patrol gu sunvisor designs incorporate central relief slots or sculpted airflow channels. These channels equalize air pressure by venting high-pressure air upward across the roofline. This vent design reduces drag on your A-pillars, minimizes wind noise inside the cabin, and keeps your fuel consumption steady.
                      [ Aerodynamic Airflow Dynamics ]
                                     │
     ┌───────────────────────────────┴───────────────────────────────┐
     ▼                                                               ▼
[ Standard Flat Visor Board ]                      [ Sculpted Vent Relief Visor ]
• High-pressure air pockets under visor brow      • High-velocity headwind enters air scoop
• Generates upward lift on windshield glass       • Air passes smoothly through central relief slot
• Causes harmonic vibration at 100+ km/h          • Pressure equalized over cab roof line
• Increases cab wind noise on highways            • Eliminates windshield chatter & drag
Proper preparation is essential before performing any physical installation on your vehicle. Below is the complete hardware and tool checklist required to mount a nissan patrol gu sunvisor securely and prevent structural issues down the track:
| Tool / Material | Recommended Type / Specification | Primary Function During Installation |
| Hand Rivnut Tool | Heavy-duty twin-handle M5/M6 insert tool | Setting threaded steel inserts into sheet metal |
| Fasteners | 316 Marine-grade stainless steel button screws | Securing mounting brackets without rusting |
| Polyurethane Sealant | Sikaflex 221 or Sikaflex 291 marine sealant | Sealing drill holes to prevent cabin water leaks |
| Anti-Corrosion Primer | Cold galvanizing spray or zinc-rich primer | Coating raw exposed steel hole edges |
| Drill Bits & Stop | 3mm pilot bit, 9mm/10mm step drill & drill stop | Drilling precise, clean holes through outer skin |
| Isolation Gaskets | 1.5mm high-density EPDM rubber sheets | Cushioning brackets against body paintwork |
| Thread Locking Compound | Medium-strength blue thread locker (Loctite 243) | Preventing hardware back-out under vibration |
| Measuring Equipment | Flexible tailor’s tape measure & masking tape | Finding precise cab centerlines and hole marks |
| Safety Gear | Eye protection goggles & clear safety glasses | Shielding eyes from flying metal swarf |
Installing your nissan patrol gu sunvisor requires meticulous attention to detail. Follow this comprehensive step-by-step procedure to ensure a weatherproof, rattle-free installation.
                  [ 5-Stage Installation Sequence ]
                                 │
  ┌───────────────┬──────────────┼──────────────┬──────────────┐
  ▼               ▼              ▼              ▼              ▼
[ Stage 1 ]     [ Stage 2 ]    [ Stage 3 ]    [ Stage 4 ]    [ Stage 5 ]
Align & Mark    Drill Holes    Seal & Insert  Mount Gaskets  Torque & Test
Centerline      with Stop      Rivnuts        & Brackets     Hardware
Achieving exact visual and structural balance requires finding the absolute geometric center of your Patrol’s windshield header before marking mounting points.
Drilling into your Patrol’s A-pillar sheet metal requires care to avoid damaging internal wire harnesses or airbag components (on later Series 4+ luxury models).
                 [ A-Pillar Drilling Cross-Section ]
                                  │
  ┌───────────────────────────────┼───────────────────────────────┐
  ▼                               ▼                               ▼
[ Outer Sheet Metal ]    [ Internal Air Gap ]           [ Inner Pillar / Loom ]
Drill outer skin only    Maintain 10mm drill clearance   Do NOT allow bit to contact
(approx 1.2mm steel).    using a mechanical stop collar. internal wiring bundles.
1.Mark Pilot Hole Coordinates:Accuracy prevents misaligned sheet metal fasteners.
With the visor taped in position, use a center punch to mark the exact center of each bracket mounting hole onto the A-pillar sheet metal. Double-check all measurements before drilling.
2.Drill Pilot Holes with Depth Stops:Prevent damaging internal wiring looms inside pillars.
Attach a drill stop set to 10mm depth to prevent your drill bit from penetrating internal A-pillar wiring harnesses. Drill pilot holes using a 3mm bit, then expand to match your M5 or M6 rivnut diameter.
3.Apply Rust Inhibitor and Sealant:Crucial step to stop hidden corrosion under paintwork.
Vacuum away all steel swarf and metal shavings immediately. Paint raw hole edges with zinc-rich primer and allow to dry. Inject a generous bead of Sikaflex marine polyurethane sealant into each hole prior to insert fitting.
4.Install Threaded Rivnuts:Provides a permanent, vibration-proof anchor point.
Insert the rivnuts into the treated holes using a dedicated rivnut tool until firmly collapsed against the inner side of the outer sheet metal skin.
Unprotected sheet metal holes on an off-road vehicle will rapidly develop rust when exposed to rain, mud, and salt air. Proper weatherproofing guarantees a leak-free installation.
                 [ Multi-Barrier Sealing Assembly ]
                                  │
  ┌───────────────────────────────┼───────────────────────────────┐
  ▼                               ▼                               ▼
[ Zinc Anti-Rust Coating ]  [ Polyurethane Sealant ]     [ Compressed EPDM Rubber ]
Protects raw drilled steel  Injected into rivnut cavity  Fills micro gaps between
edges against moisture.     to block water ingress.      bracket foot and chassis paint.
Bolting metal mounting brackets directly against vehicle paintwork creates hard contact points that wear down paint over time, leading to hidden corrosion under the brackets.
             [ Bracket Hardware Stack Order ]
                            │
  ┌─────────────────────────┼─────────────────────────┐
  ▼                         ▼                         ▼
[ Stainless Button Bolt ] → [ Lock Washer ]        → [ Bracket Arm ]
                            │
                            ▼
[ EPDM Cushion Pad ]    → [ Polyurethane Bead ]    → [ Threaded Rivnut ]
With all fasteners installed loosely, complete the final alignment check before securing the assembly:
Before operating your vehicle on public roads, ensure your newly installed nissan patrol gu sunvisor fully complies with national vehicle safety regulations. In Australia, aftermarket exterior body accessories are governed by transport standards accessible via the Federal Register of Legislation under Australian Design Rule ADR 12/00 (Glare Reduction and Driver Field of View).
                 [ Road Safety & Legal Requirements ]
                                  │
  ┌───────────────────────────────┼───────────────────────────────┐
  ▼                               ▼                               ▼
[ Driver Field of View ]    [ Edge Radius Safety ]       [ Vehicle Dimensional Limits ]
Visor frame must not extend Visor & bracket edges must   Overall accessory width must
below primary wiper sweep   feature minimum 2.5mm - 5mm  stay within the outer body
zone on front glass.        rounded radius corners.      line of your Patrol's cab.
Even a professionally installed nissan patrol gu sunvisor requires periodic maintenance to handle thousands of kilometers of corrugations, dust storms, and heavy trail use.
                  [ Preventative Maintenance Schedule ]
                                    │
    ┌───────────────────────────────┼───────────────────────────────┐
    ▼                               ▼                               ▼
[ Initial 100 km Check ]       [ Bi-Annual Hardware Audit ]    [ Annual Sealant Inspection ]
Re-torque all stainless bolts  Inspect rivnuts for movement;   Examine polyurethane beads
after initial highway run to   re-apply thread locker if       around brackets; touch up
settle rubber gaskets.         fasteners show looseness.       weatherproofing as needed.
Rubber isolation pads naturally compress slightly during your first few drives. After completing 100 km of driving with your new nissan patrol gu sunvisor, use a hex key to check and re-torque all mounting screws. This step prevents minor vibrations from loosening the hardware over time.
Corrugated dirt tracks generate severe harmonic chatter throughout your vehicle’s frame. Make it a habit during extended outback trips to visually inspect your visor brackets during morning pre-trip checks. Ensure bolts remain snug and verify the visor body shows no signs of stress cracking around mounting points.
Fitting an engineered nissan patrol gu sunvisor transforms your 4WD’s touring capability. By intercepting blinding sun glare, blocking UV radiation outside the windshield, and reducing interior cabin heat, an exterior sunvisor keeps you relaxed and alert behind the wheel.
By following proper installation practices—using quality stainless steel hardware, precision rivnuts, anti-corrosion primers, and marine polyurethane sealants—you protect your vehicle’s sheet metal while creating a durable, silent, and weatherproof setup ready for your next Australian adventure!