
Driving westward across regional Australian highways into blinding low-angle sunlight causes severe eye strain and turns your vehicle’s dashboard into a radiant heater. Fitting an external windscreen visor blocks harsh ultraviolet and infrared rays before they can heat the glass, dropping interior cab temperatures by up to 12°C. However, the biggest question holding owners back from upgrading is whether it is possible to carry out a sun visor installation without drilling into their vehicle’s cab.
Many 4WD owners dread taking a drill bit to factory sheet metal, fearing water leaks, interior headliner dampness, or hidden rust bubbles inside the A-pillars. While claims of a simple, glue-on sun visor installation without drilling circulate on social forums, the physical forces acting on an exterior visor at 110 km/h require a serious look at structural mechanics.
This technical guide breaks down the reality of a sun visor installation without drilling, comparing traditional rain-gutter clamps, modern gutterless door-jamb profiles, adhesive limitations, and professional weatherproofing methods to keep your vehicle completely protected.
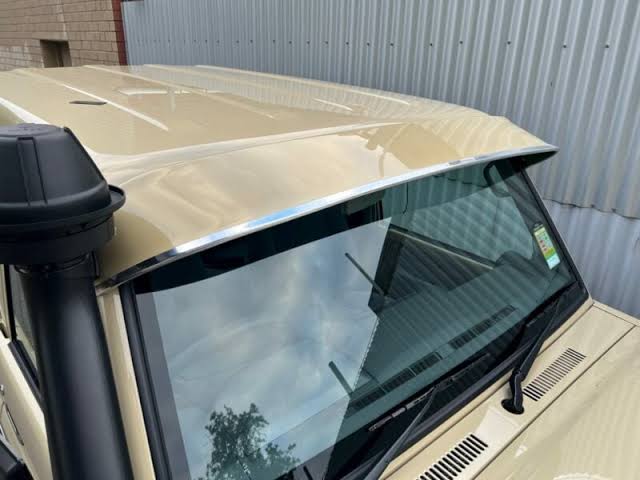
The Physics of Highway Uplift: Why Exterior Visors Require Rigid Mounting
To understand why a 100% glue-based sun visor installation without drilling is structurally dangerous for heavy exterior visors, consider the aerodynamic uplift forces generated at open-road touring speeds:
                          [ 110 km/h Wind Stream ]
                                     |
                                     v
                 =========================================  <-- Sun Visor Blade
                   /                                   \
                  v                                     v
         (High Dynamic Uplift)                 (Air Turbulence Pocket)
                  ^                                     |
                  |                                     v
       =======================                   [ Windscreen ]
        [ Cab Roof Sheet Metal ]                        |
                                                  [ Dashboard ]
When cruising down an outback highway at 100 to 110 km/h, air hits your bonnet and rushes up the windscreen glass. This creates a powerful aerodynamic uplift pocket directly beneath the visor blade.
A heavy-duty steel or composite visor weighs between 4kg and 8kg. Under constant highway buffeting, road vibrations, and severe outback corrugations, an exterior visor experiences dynamic lifting and twisting forces exceeding 40kg to 60kg of force.
Relying on double-sided tape, automotive silicone, or weak suction clips for a sun visor installation without drilling will inevitably fail. When an adhesive bond fatigues under prolonged Australian sun exposure, the visor can rip off at highway speeds, presenting an extreme safety hazard to trailing traffic.
When Can You Truly Complete a Sun Visor Installation Without Drilling?
The only scenario where an authentic, secure sun visor installation without drilling is mechanically possible is on classic vehicles equipped with structural external roof rain gutters.
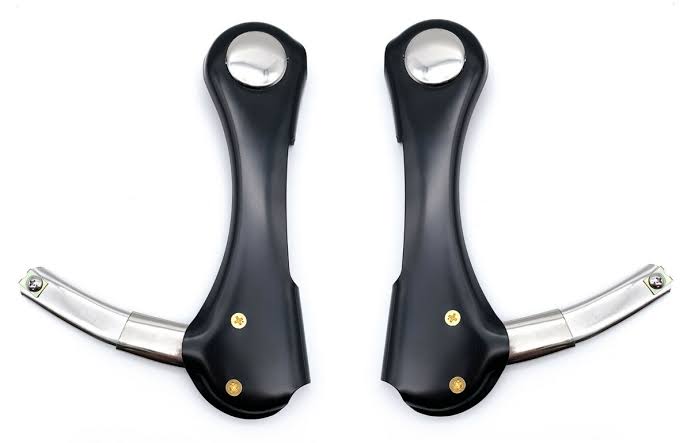
Vehicles like early Toyota LandCruisers (HJ47, FJ40, 60 Series, 75 Series, 80 Series), classic Nissan Patrols (GQ/Y60), and the iconic Solid LN106 Hilux Sunvisor feature raised, welded steel drip channels along the roofline.
On these classic guttered cabs, specialised bracket hardware clamps around the lip of the rain gutter:
- J-Hook and Vice Clamping Brackets: The bracket hooks beneath the rolled lower edge of the rain gutter, while an upper clamping plate tightens down with high-tensile stainless steel bolts.
- Friction-Lock Stability: By sandwiching the factory gutter between rubber-gasketed steel plates, you achieve a rock-solid mechanical anchor for your sun visor installation without drilling into the upper roof skin.
- Paint Preservation: High-density rubber or nylon pads sit between the metal clamp and the gutter paintwork, preventing metal-to-metal rubbing and stopping surface corrosion.
However, even on vehicles with rain gutters, manufacturers often recommend adding one small stabilizing screw per side into the lower A-pillar seam. This secondary fastener prevents the visor from pivoting backwards during high-speed road-train buffeting.
The Modern Reality: Gutterless Cabs and A-Pillar Mounting
From the mid-2000s onward, automotive manufacturers eliminated exterior rain gutters to improve aerodynamics and reduce wind noise. Utilities like the N70 and N80 Hilux, Ford Ranger, Isuzu D-Max, and modern LandCruisers have smooth, seamless rooflines.
On these modern utilities, an exterior sun visor installation without drilling is simply not an option for heavy-duty setups:
| Vehicle Generation | Roof Architecture | Can You Install Without Drilling? | Required Mounting Hardware |
| LandCruiser 70/76/79 Series | Upright cab with drip gutters | Yes (Partially) via gutter clamps; A-pillar pilot screws recommended for high speeds | Gutter vice-clamps & A-pillar stainless fasteners |
| LandCruiser 80 Series | Curved windscreen with full drip gutters | Yes via gutter clamps; lower pillar locating screws optional | Heavy-duty gutter clamp plates with rubber isolators |
| Hilux LN106 (1988–1997) | Square cab with external rain gutters | Yes via gutter clamp brackets | Dual gutter clamping assemblies |
| Hilux N70 (2005–2015) | Curved, aerodynamic gutterless roof | No — Mechanical fastening is mandatory | A-pillar flange rivets or rubber well-nuts |
| Hilux N80 / Ranger / D-Max | Raked, gutterless roofline | No — Mechanical fastening is mandatory | Precision door-jamb return brackets & rivets |
Attempting a sun visor installation without drilling on an N70, N80, or modern dual-cab ute using adhesive tape will end in failure. For these modern cabs, choosing a vehicle-specific shield like the Solid N70 Hilux Sunvisor or the Solid Toyota Hilux 2015-On Mesh Sunvisor provides custom-moulded A-pillar brackets designed to install neatly into the concealed door-jamb seam.
How to Drill into A-Pillars Without Leaks or Rust
If your 4WD has a gutterless cab and requires mechanical fasteners, you do not need to fear drilling. When performed with professional workshop techniques, drilling mounting holes will never result in water leaks, headliner dampness, or cab rust.
Follow this proven, weather-sealed procedure:
[Dry-Fit Visor & Align Symmetrically Across Windscreen]
                           │
                           ▼
[Mark Pilot Holes in A-Pillar Door Seams (Not Roof Skin)]
                           │
                           ▼
[Drill Holes with Stop-Collar & Vacuum Metal Swarf]
                           │
                           ▼
[Coat Raw Steel Edges with Cold-Galvanising Zinc Primer]
                           │
                           ▼
[Inject Automotive Polyurethane Sealant Directly into Holes]
                           │
                           ▼
[Fasten Brackets, Wipe Flush & Allow 24h Full Cure]
- Drill Into the Door-Jamb Flange, Not the Outer Roof Skin: Premium visors—such as the Solid 79 Series Sun Visor and the Elite Toyota Land Cruiser 70-79 Series Sunvisor—fasten into the secondary pinch-weld or outer A-pillar door frame. You are never drilling through the main roof panel or puncturing interior headliners.
- Use a Drill Stop-Collar: Set a mechanical stop-collar on your drill bit at 10mm depth. This ensures your drill bit penetrates only the outer sheet metal skin without catching internal wiring looms or airbag harness channels.
- Prevent Corrosion with Cold-Galvanising Primer: Immediately remove all metal shavings using a magnet or shop vacuum. Coat the exposed, raw edges of every drilled hole with a cold-galvanising zinc-rich primer or automotive etch primer to guarantee lifetime rust prevention.
- Use Automotive Polyurethane, Never Bathroom Silicone: Domestic silicones release acetic acid (vinegar smell) during curing, which chemically attacks bare steel and accelerates rust. Always use an automotive-grade polyurethane adhesive sealant (such as Sikaflex 221). Inject the polyurethane directly into each hole before driving in stainless steel screws, blind rivets, or rubber well-nuts. The sealant forms a vulcanised, 100% waterproof rubber seal that dampens vibrations and blocks water permanently.
Mesh vs Solid Visors: Mounting Stress and Hardware Loads
The style of visor you select directly affects the mechanical stress placed on your mounting brackets:
[ Solid Steel Visor ]
• Acts as an aerodynamic air blade, generating higher lift forces
• Demands high-tensile mechanical fasteners or heavy-duty gutter clamps
• 100% direct sunlight and thermal heat blockout
• Maximum defense against heavy scrub branches on overgrown bush tracks

[ Alloy Mesh Visor ]
• Hundreds of expanded louvers allow air to pass through freely
• Greatly reduces aerodynamic uplift forces on mounting points
• Ideal candidate for vehicles where minimal mechanical load is desired
• Lightweight profile reduces dynamic stress over outback corrugations
If you are determined to minimise physical stress on your cab structure, selecting a lightweight option like the Solid Heavy Duty Alloy sunvisor or the Solid 4×4 Sun Visor reduces the dynamic loads transferred through the mounting hardware while maintaining excellent cab shade.
Australian Road Regulations and Compliance Standards
Regardless of whether you utilise gutter clamps or mechanical A-pillar fasteners, every aftermarket visor must comply with state and national road transport standards:
- The 11-Metre Forward Field of View Rule: Under Australian Design Rule guidelines and state modification codes—including Transport Victoria VSI 8 Vehicle Modification Standards and Transport for NSW Light Vehicle Safety Check Rules—an external sun visor must not encroach into the driver’s forward field of vision. The driver, seated in a normal driving position, must have an unobstructed view of the road surface 11 metres ahead of the vehicle.
- Structural Security: A loose or poorly adhered visor that rattles or lifts violates safety standards. Transport authorities can issue an unroadworthy defect notice if an accessory is deemed at risk of detaching from the vehicle at speed.
- Edge Radii and Pedestrian Safety: Under Australian Standard AS 4876.1 and local regulations, external fittings must feature rounded, deburred edges with a minimum 5mm radius to minimise injury risks. Sharp metal corners or protruding brackets are strictly illegal on public roads, as administered under the Department of Infrastructure Australian Design Rules.
Frequently Asked Questions
Can I complete a sun visor installation without drilling using double-sided 3M VHB tape?
No. Attempting a sun visor installation without drilling using double-sided adhesive tape is dangerous and should never be done on external 4WD sun visors. While 3M VHB tape works well for lightweight window weather shields and bonnet protectors, an exterior windscreen sun visor weighs 4kg to 8kg and experiences massive upward aerodynamic lift at 110 km/h. High temperatures, outback dust, and wind buffeting will degrade the adhesive, causing the visor to break away at speed.
Which vehicles allow a true sun visor installation without drilling?
A 100% mechanical sun visor installation without drilling is only possible on vehicles equipped with traditional raised external roof rain gutters. This includes older Toyota LandCruisers (40, 60, 70, 75, and 80 Series), early Nissan Patrols (MQ, GQ), and pre-1998 Hilux models (LN106). These vehicles can utilise heavy-duty clamp brackets that grip the rain gutter lip securely without penetrating the metal.
Will drilling into my A-pillars cause my cab to rust?
Not if you follow proper automotive sealing techniques. Rust only develops if bare steel is left exposed to moisture and oxygen. By vacuuming away all metal shavings, treating the drilled holes with cold-galvanising zinc primer, and injecting automotive polyurethane sealant (such as Sikaflex 221) prior to inserting fasteners, the steel remains 100% sealed against water, salt spray, and atmospheric corrosion.
Does a sun visor installation without drilling stay secure on outback corrugations?
Gutter clamp systems designed for a sun visor installation without drilling can remain secure on outback corrugations, provided the clamping hardware uses nylon-locking nuts and is inspected regularly. However, the intense vibration of corrugated tracks can cause friction clamps to shift over thousands of kilometres. Adding one small stainless locking screw into each A-pillar seam provides the ultimate peace of mind on remote trips.
Do I need to drill through the vehicle headliner inside the cabin?
No. You will never drill through into the interior roof headliner. Quality aftermarket sun visors are engineered with brackets that fasten strictly into the outer A-pillar door-jamb seam or rain gutter lip. The holes enter the exterior structural pillar cavity only, well away from interior upholstery, wiring harnesses, or side-curtain airbags.
Summary: Striking the Right Balance for Your Build
While the idea of a sun visor installation without drilling is appealing, structural safety on Australian highways must always take priority. If your vehicle features traditional roof drip gutters, high-tensile clamp brackets allow you to mount an exterior visor without making permanent holes in your roof skin. If you drive a modern gutterless ute or wagon, taking the time to drill, zinc-prime, and polyurethane-seal custom A-pillar brackets ensures a rattle-free, weather-sealed installation built to survive the harshest outback conditions.
Explore the complete range of external 4WD sun visors to find precision-engineered fitments for your rig, or pair your cab shade with heavy-duty 4WD bull bars and front accessories to complete a dependable touring setup.