
Executing a heavy-duty landcruiser 79 tray kit build is the ultimate structural upgrade for turning Toyota’s legendary 70 Series platform into an unyielding workhorse or outback touring rig. The Toyota LandCruiser 79 Series—whether powered by the iconic 1VD-FTV 4.5L V8 turbo-diesel or the 1GD-FTV 2.8L inline-four—is world-renowned for its rugged C-section chassis rails and massive payload capacity. However, unlocking the full potential of this heavy-duty chassis relies on assembling a flatbed platform that matches its offroad durability. Undertaking a DIY or professional landcruiser 79 tray kit build gives you total control over rear deck dimensions, under-tray toolboxes, water tank integration, and canopy mounting points.
For remote touring enthusiasts, station owners, and commercial operators, planning a landcruiser 79 tray kit build requires an understanding of chassis articulation, axle weight distribution, and dynamic loading forces. Replacing a basic factory body with a precision modular tray subframe ensures your 79 Series carries heavy toolboxes, spare tires, and slide-on camping modules without introducing frame fatigue. Whether you own a single cab or double cab 70 Series, mastering every phase of a landcruiser 79 tray kit build ensures your vehicle achieves maximum departure angles, robust fuel filler routing, and long-term trail reliability.
In this ultimate technical guide, we break down the 10 crucial steps of a landcruiser 79 tray kit build. From subframe runner alignment and rubber chassis isolation to dual fuel neck bracketry, LED tail lamp harness wiring, and transport compliance, this article provides the complete technical blueprint for your landcruiser 79 tray kit build.
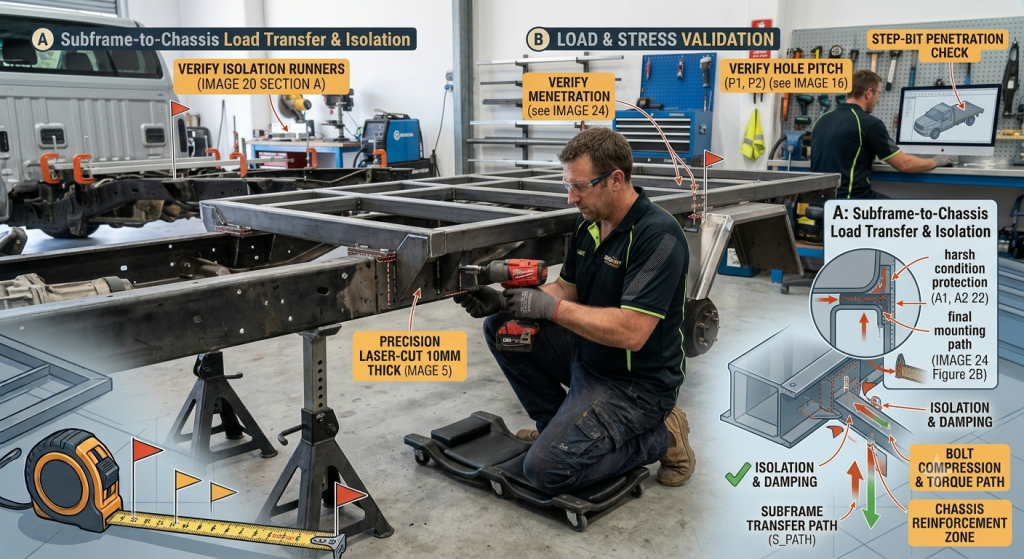
Understanding the mechanical interaction between the LC79 ladder-frame chassis and a landcruiser 79 tray kit build is essential for maintaining frame flex and structural durability.
                 [ Mechanical Architecture of an LC79 Tray Kit Build ]
                                           │
  ┌────────────────────────────────────────┴────────────────────────────────────────┐
  ▼                                                                                 ▼
[ Chassis Rail Runner Interface ]                                 [ Heavy-Duty Subframe Structure ]
• Fits parallel to 79 Series heavy C-section ladder frame         • Structural 75x40mm RHS or 80x50mm extruded alloy runners
• Incorporates model-specific laser-cut mounting brackets         • Transverse crossmembers spaced to resist point-loading
• Fitted with heavy EPDM rubber isolation pads against chatter    • Heavy perimeter coaming rails with rope rail tie-downs
• Preserves factory rear chassis flex during cross-axle driving   • Integrated headboard frame with rear cab protection window
Unlike lighter dual cab utility vehicles, the Toyota LandCruiser 79 Series features a wider, rigid ladder chassis built for heavy industrial payloads. A high-quality landcruiser 79 tray kit build features longitudinal main subframe runners designed to sit directly over these factory chassis rails. Connecting these main runners with heavy-duty transverse crossmembers creates a rigid floor support matrix during your landcruiser 79 tray kit build, preventing floor deck buckling under dense cargo like fuel drums or mobile machinery.
Additionally, installing thick EPDM rubber isolation pads between the factory chassis brackets and tray runners is a critical phase of any landcruiser 79 tray kit build. These isolation pads dampen harmonic engine and road vibrations while allowing the 79 Series frame to twist naturally across technical cross-axle tracks, protecting the tray welds from metal fatigue.
Building a custom flatbed onto an LC79 frame requires methodical positioning and assembly steps. Here are the 10 core operational stages to execute during your landcruiser 79 tray kit build:
Before starting a landcruiser 79 tray kit build, clear the rear frame by unbolting factory tie-downs, cleaning chassis scale, and inspecting mounting tabs for rust or debris.
Laying EPDM rubber strips along the top of the 79 Series chassis brackets is a foundational step of a landcruiser 79 tray kit build, preventing direct metal-on-metal friction.
Place the main longitudinal structural runners onto the chassis mounts. Precision laser-cut brackets included in your landcruiser 79 tray kit build align directly with OEM 70 Series hole patterns.
Measuring diagonally corner-to-corner across main runners ensures your landcruiser 79 tray kit build results in a perfectly square subframe relative to the front cab.
Bolt or tack-weld crossmembers perpendicular to the main runners. Proper crossmember spacing in a landcruiser 79 tray kit build ensures maximum point-load resistance across the floor deck.
The 79 Series features dual fuel tanks; securely mounting both fuel filler necks and breather hoses to the subframe bracketry is a vital stage of your landcruiser 79 tray kit build.
Fit high-strength aluminum floor planking or heavy steel sheet onto the subframe. Fastening deck floor panels cleanly completes the primary deck structure during a landcruiser 79 tray kit build.
Mount the front headboard frame during your landcruiser 79 tray kit build to protect the rear cab glass and provide high anchor points for tall equipment.
Connect weatherproof LED tail light clusters into the 79 Series wiring harness using sealed plugs, completing the electrical phase of your landcruiser 79 tray kit build.
Finish your landcruiser 79 tray kit build by installing wide mudguards with adequate tire compression clearance and torquing all chassis bolts to factory engineering specifications.
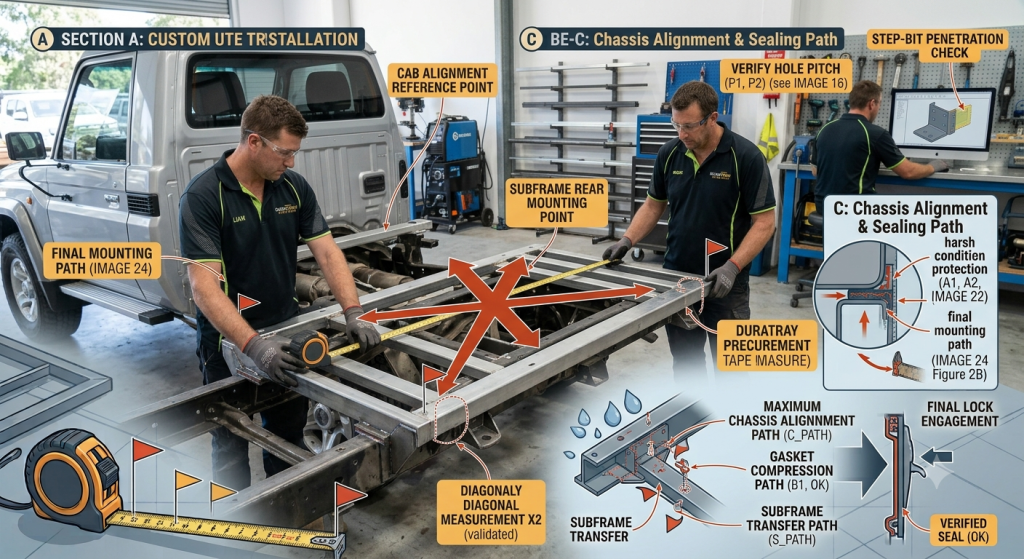
Figure 2: Verifying diagonal subframe measurements during a landcruiser 79 tray kit build guarantees precise alignment with the LandCruiser cab.
Evaluating structural metrics helps owners select the correct style of landcruiser 79 tray kit build for their specific touring or commercial workload:
| Specification / Feature | Heavy Steel LC79 DIY Kit | Modular Alloy LC79 DIY Kit | Commercial Single Cab Steel Kit | Factory OEM Steel Tray |
| Typical Deck Length | 2,100mm – 2,400mm | 2,100mm – 2,400mm | 2,400mm – 2,500mm | 2,100mm – 2,250mm |
| Average Kit Unladen Weight | 180 kg – 250 kg | 95 kg – 140 kg | 210 kg – 270 kg | 190 kg – 230 kg |
| Main Runner Material | 75x40x3.2mm Structural RHS | 80x50x4.0mm Extruded Alloy | 75x40x4.0mm Structural RHS | Press-Formed Channel Steel |
| Dual Fuel Neck Support | Fully Integrated Brackets | Fully Integrated Brackets | Integrated Heavy Bracket | Factory OEM Bracket Set |
| Static Weight Rating | 2,000+ kg Distributed | 1,400+ kg Distributed | 2,200+ kg Distributed | 1,200+ kg Distributed |
| Under-Tray Tool Space | Maximum Dual Box Volume | Maximum Dual Box Volume | Maximum Dual Box Volume | Restricted Rear Space |
| Offroad Protection Level | Extreme Heavy-Duty Shield | High-Grade Touring Armor | Extreme Heavy-Duty Shield | Standard Workhorse Grade |
Choosing appropriate structural metals is a pivotal planning stage when preparing for a landcruiser 79 tray kit build.
                [ Material Engineering for an LC79 Tray Kit Build ]
                                         │
  ┌──────────────────────────────────────┴──────────────────────────────────────┐
  ▼                                                                             ▼
[ Structural Carbon Steel (Grade 250/350) ]                   [ Marine-Grade 6061-T6 Aluminum Alloy ]
• Maximum point-load strength for dense equipment & machinery  • Saves 80 kg to 120 kg of unladen tray weight on your build
• Superior resistance to severe impact gouging and dents       • Excellent natural barrier against coastal salt air rust
• Easily repaired using standard MIG or stick welding units     • Keeps vehicle total mass well within legal GVM limits
• Requires zinc-rich primer and heavy powder coat finish       • Requires rubber isolation washers against galvanic corrosion
Selecting structural steel for a landcruiser 79 tray kit build provides maximum rigidity and high yield strength. Steel RHS main runners handle severe point-loading without fracturing, making steel an ideal choice for station work, mining fleets, and heavy trades. While a steel landcruiser 79 tray kit build adds slightly more unladen weight to the chassis than an aluminum kit, its structural resilience on corrugated outback tracks is exceptional.
For 79 Series owners seeking to optimize usable payload margins, an aluminum landcruiser 79 tray kit build offers substantial weight savings. High-strength 6061-T6 extruded aluminum floor planking reduces total tray weight by up to 45% compared to steel. An aluminum landcruiser 79 tray kit build is inherently rust-resistant, making it a popular option for beach driving, coastal touring, and carrying heavy slide-on canopy modules.
Follow this structured operational sequence to execute your landcruiser 79 tray kit build safely and efficiently.
1.Prepare Vehicle and Clean Chassis Mounting Tabs:Clear workspace, support 79 chassis on jack stands, and clean frame tabs.
Park your LC79 on a level concrete surface and support the rear frame safely. Clean all road grime and scale off the factory chassis tabs to prepare for your landcruiser 79 tray kit build.
2.Fit Chassis Isolation Pads and Main Runners:Place rubber pads on brackets and position longitudinal main runners.
Lay heavy-duty EPDM rubber isolation pads along the chassis mounting brackets. Lift the main subframe runners into place to begin the core structural assembly of your landcruiser 79 tray kit build.
3.Assemble Crossmembers and Verify Subframe Diagonals:Attach crossmembers loosely, measure corner diagonals, and verify squareness.
Bolt or tack-weld crossmembers to the longitudinal runners. Measure diagonally corner-to-corner across the subframe to confirm absolute squareness during your landcruiser 79 tray kit build.
4.Route Fuel Filler Necks, Lay Floor Deck, and Add Headboard:Mount fuel filler necks, attach floor deck panels, and secure headboard.
Secure both factory fuel filler necks to the subframe bracketry. Install the floor deck planks and bolt on the front headboard frame as your landcruiser 79 tray kit build takes shape.
5.Install Mudguards, Wire LED Lights, and Final Torque:Mount mudguards, wire LED lighting harness, and torque chassis bolts.
Attach mudguards over the rear tires, plug the LED tail light loom into the factory harness, and torque all high-tensile chassis bolts to complete your landcruiser 79 tray kit build.
explore our complete range of 4x4 armor, side steps, and rock sliders
Every completed landcruiser 79 tray kit build must satisfy national vehicle safety standards. In Australia, rear tray modifications are regulated by standards published by the Federal Register of Legislation under Australian Design Rules ADR 13/00 (Installation of Lighting) and ADR 42/00 (General Safety Requirements).
                  [ ADR Safety Compliance Rules ]
                                     │
   ┌─────────────────────────────────┼─────────────────────────────────┐
   ▼                                 ▼                                 ▼
[ Maximum Rear Overhang Limits ]  [ Mudguard Coverage Rules ]       [ Rear Lamp Visibility Angles ]
• Must not exceed 60% of wheel    • Mudguards must cover full tire  • Tail lights must remain visible
  base or maximum 3.7 meters       tread width and 45-deg rear angle  at mandatory 45-degree angles
Protecting your completed landcruiser 79 tray kit build against stone spray, mud, and heavy equipment wear ensures long service life.
Reviewing real-world applications demonstrates how 70 Series owners execute a landcruiser 79 tray kit build:
Use this practical summary checklist when planning your landcruiser 79 tray-kit build: